

A O Smith Powder Shot 40 Gal Natural Gas
 Particulate Debris in the Water Supply
Diagnose & Flush out Particles from a Disintegrated Water Heater Dip Tube
- POST a QUESTION or COMMENT about flushing debris and dirt out of water heater tanks
InspectAPedia tolerates no conflicts of interest. We have no relationship with advertisers, products, or services discussed at this website.
White plastic debris particles coming from water heater tank versus black crud in the water supply:
Hhere we explain how white and gray debris particles in the building water supply and clogging faucet strainers were traced to a bad water heater plastic dip tube. The dip tube was replaced, but then we had to flush the water heater to remove the old dip tube debris fragments. Here is how we did it.
The articles at this website will answer most questions about diagnosing and curing noisy domestic water heaters and about the procedure to remove mineral deposits, lime, water scale, silicates, sulfates, aluminates, or silt and sand from a water heater tank.
We also provide an ARTICLE INDEX for this topic, or you can try the page top or bottom SEARCH BOX as a quick way to find information you need.
Diagnose Particulate Debris in the Building Water Supply & Supply Piping
 Article Contents
- WATER HEATER DEBRIS FLUSH - Water supply particle contamination troubleshooting & repair.
- How to diagnose and cure debris found in the building water piping and supply
- Tracing white and gray particles in the faucet strainers and water supply to the water heater
- What caused white debris particles to come out of the water heater and what were the particles made of?
- Simple lab tests on white debris particles in water supply rule out mineral scale or lime scale particles
- How to flush particles and debris out of a hot water heater to clean up the home water supply
- Fixing repeated clogging of sink faucet aerators and strainers
- WATER HEATER DEBRIS FAQs
Tracking Down the Source of White, Gray or Black Particles Clogging Faucet Strainers
White or gray debris in the water supply: As an example of how one might find and cure the cause of debris clogging of faucet strainers and debris found in a building water supply, This article describes and photo-illustrate our diagnostic and repair procedure.
Ralph asked if we could take a look at the sudden appearance of debris particles that kept clogging the faucet strainers in his home.
Other white crud on plumbing fixtures can be caused by mineral deposits or from other problems
See WHITE STAINS from WATER SUPPLY
but these particles, as we show just below, did not look like a naturally-occurring substance.
Check the Faucet Aerators for Debris Clogging & Clean Them if Necessary
 The first step was to try just cleaning out the faucet strainers and flushing out the water piping lines by running faucets for a few minutes with no strainer in place.
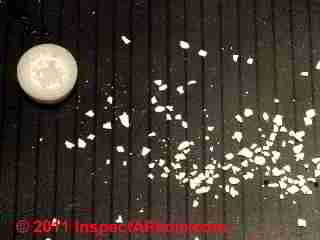
Our photo shows a faucet aerator that has been disconnected and its debris dumped out onto a black dish drainer.
There were plenty of white and white-tan colored particles of varying sizes.
That didn't work.
These faucet strainers would clog up again in just a few days.
Clearly there was a problem particle source that we needed to track down.
Watch out: black debris in the water supply, (which is not what we saw in Ralph's faucets) including in the water heater tank, may be from bacteria (common in water heaters), sulphur, magnesium, organic debris, or silt.
In addition, several water contaminants such as iron and magnesium can feed bacteria in the water system that produce orange or black slime and odors that may smell like fuel oil, heating oil, sewage, or even cucumbers.
See WATER STAINING CONTAMINANTS where we discuss the relationship between these stain sources and odors in the water supply.
Odors in water are diagnosed beginning
at WATER ODORS, CAUSE CURE
Look at the faucet strainer clogging particles and do this simple debris test
It was not easy to identify just what these particles were by naked eye examination. But looking under magnification such as a high power hand-held magnifying glass or better, under a stereo microscope we could take a look at the particle size and shape for clues.
Mineral deposits and random soil or dirt particles will be irregular in shape. We didn't take this step but we could have. It might have saved some time.
If the faucet-clogging particles are mineral crud or dirt or soil particles or rust, they will be rough and random in shape.
Had we looked closely at our particles we might have seen that at least some of them were rather shard-like and a few were roughly rectangular with straight edges. That would have suggested that these particles came from a wo/man-made material. We didn't look this carefully, but we could have. It might have saved some time.
Squash the Water System Debris Particles
We did observe that these particles were pretty soft - you could easily mash them to powder between a thumb and forefinger - this was not sand or dirt. You can see this with the naked eye, but it was instructive to examine these particles in our forensic laboratory (photos below).
The particle shapes (tending to be rectangular and flat) and texture seemed to argue against their consisting of mineral fragments (that tend to be irregular in all dimensions).
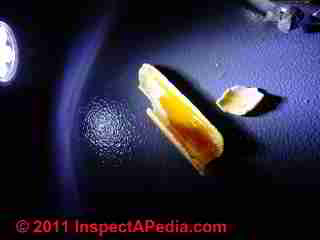
White debris particles in water supply, examined in the stereo microscope
In our lab photo below left you can see several interesting features about these white particles:
The edges of the particles tend to be straight or linear, the top surface shows multiple fine cracks or fragmentation in process (stressing I'd call it), and where the particle was easily crushed using light pressure from forceps, it crumbles into a very fine dust in which particles are reduced from 1/8" to micron-range sizes in their longest dimension.
Look closely at the debris particle at upper left - you can also see some brown staining that appears to be iron deposits or possibly silt from the building water piping and supply.
In our later photos (below) you can see this same orange coating on the interior of the dip tube pipe fragment.
Try to Dissolve the Debris Particles - A Home Chemistry Test for Mineral Deposits
Our second forensic lab photo of the white debris particles found in Ralph's faucet strainer (above right) demonstrates what happened when we exposed the particles to a mild acid. Any mild acid would have been fine. The particles remained intact and went into suspension, even after five minutes or more of exposure. Exposure to a base also did not affect these particles.
Note: Acids commonly used for particle immersion include lactic acid and acid fuschin. Bases commonly used in the lab for particle immersion include KOH and NaOH. Thanks to reader Tom for pointing out the need for this clarification - 9/6/12.
If these white debris particles had been calcium, a common mineral deposited in "hard water" supply systems and one that can leave white deposits or even build up into thick white deposits , they would have dissolved. Our acid had no effect on these particles, lending credence to the hypothesis that they are plastic and were formed from a deteriorated plastic water heater dip tube.
See WATER HEATER SCALE DE-LIMING PROCEDURE
We could also have put these particles in vinegar (a mild acid) to see if they would dissolve.
A common restoration repair for mineral-clogged and coated faucet strainers or other plumbing parts is to soak them over night in vinegar.
The acidic soak will usually soften and often dissolve calcium or magnesium mineral deposits and crud while leaving the chromed or plastic parts un-damaged. We didn't take this step but we could have.
Because of what Ralph said in the next step in our water particle crud diagnosis discussion this whole lab step of trying to dissolve particles to see if they were minerals could be skipped. Ultimately we confirmed by direct inspection and discovery of the source that these small white fragments were debris from a disintegrating plastic dip tube in the water heater.
Consider the Building Age and Age of Plumbing Pipes and Appliances
The New York home where these water system particles is connected to a municipal water supply. A first guess would tend to rule out mineral deposits or crud that might be breaking free in a water heater or in water piping. But we didn't fully rule that out: the home is old enough that it might have been previously connected to a private well and hard or high-mineral-content water.
But we didn't' think hard water was a likely cause of these particles because usually mineral build-up sticks like glue to the inside of pipes and water heaters. Unless something disturbed it such as the water heater de-scaling operation described
at WATER HEATER SCALE DE-LIMING PROCEDURE.
Check the Building Plumbing Repair History
Homing in on a bad water heater dip tube
In discussing the history of the building pipes and plumbing equipment, Ralph mentioned that the water heater (which was more than 10 years old, had recently been producing tepid "hot" water. A plumber was called to diagnose the trouble. He found that the water heater dip tube "needed replacement" and a new one was installed.
A leaky water heater dip tube can cause hot water to run tepid, as we explain
at ANODES & DIP TUBES on WATER HEATERS
and also illustrate
at TEMPERATURE of HOT WATER is TOO LOW or COOL
Because most sink and tub faucets use a common spout for both hot and cold water, it won't be obvious whether particles or debris are coming just hot water, just cold water, or both hot and cold water when we just examine a clogged [sink] faucet strainer.
But we did observe that faucets that were used to run a lot of hot and warm water - the kitchen sink, for example, clogged much faster than other faucets in the home.
We decided that there was a good chance that water heater dip tube parts might be the source of this building water supply debris. Also, since Ralph pointed out that the water heater tank had never been drained, we figured that performing that normal maintenance task was a good idea anyway.
Like vacuuming refrigerator coils, the manufacturer may recommend an annual maintenance task but many building owners have other problems on their mind.
Draining the Hot Water Tank to Look for and Remove Dip Tube or Anode Fragments
We decided that it made sense to drain and flush the water heater tank.
We figured that we would be able to see if there was a scaling or liming problem or some other rust or crud problem by peeking into the water heater tank bottom through the water heater drain valve opening.
See photos in this separate article at WATER HEATER SCALE DE-LIMING PROCEDURE.
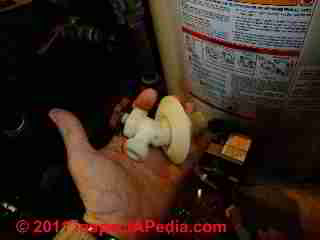
Our photo (left) is a sneak preview of what we found inside this water heater and of what was confirmed as our building plumbing particulate debris source.
Warnings Before Starting to Work on a Water Heater
Watch out: draining and flushing out a residential water heater is pretty easy and only a few common hand tools (adjustable wrench) are needed.
But it's only easy if nothing goes wrong. A stuck or broken control valve or drain valve, or difficulty finding how to drain water out of a basement-located water heater with no nearby floor drain can all present challenges during the drain operation, and there can be a few surprises when you are putting things back together too: a leaky water heater drain valve or leaky water heater relief valve.
See DRAIN a WATER HEATER TANK
That article describes dealing with the more common of these water heater tank draining troubles: defective water heater tank drain valve, water heater cold water-in supply valve won't operate. .
Watch out: Safety Warnings: don't tackle this water heater cleanout project on a Sunday night when you can't call a plumber or buy a replacement part. Water heaters, their heating source (oil or gas burner or electricity or solar hot water), and particularly their relief valves include critical safety components.
Do not modify or remove relief valves, chimney connections, draft hoods, etc. as you may create dangerous conditions.
Steps in Draining the Water Heater to Check for Dip Tube Debris & Flush Water Heater Tank Debris Out of the System
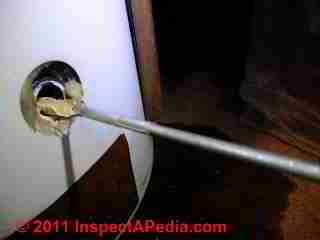
Following the first steps at WATER HEATER DRAIN PROCEDURE we drained the water heater tank, but we had to make use of a pony pump to get our water heater to drain "uphill" and out of a basement window, as we illustrate here.
At WATER HEATER DRAIN PROCEDURE the basic steps illustrated there include:
- Turn off electrical or gas fuel or power to the water heater and
- Let the water heater cool down to avoid scalding burn hazards
- Turn off water supply to the heater
- Drain the Water Heater - opening the water tank drain work: we have to allow air into the water heater tank as water is running out. A trick or two to get air into the water heater are described (and warned about) in detail
at WATER HEATER AIR INLET.
We let air into the heater at this water heater's pressure/temperature relief valve.
Use a pony pump if you need to drain "uphill" from the hot water tank to a suitable drain location.
See PUMPS, PONY PUMPS for details.
Because there was no convenient floor drain to accept water heater drainage, we using a common garden hose routed to outdoors or to an indoor building drain lower than the water heater outlet.
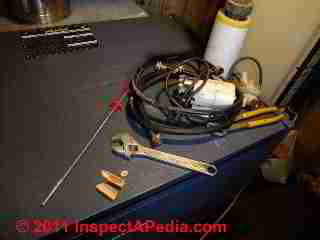
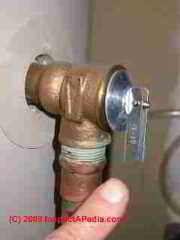
The tools we needed to flush the water heater are shown in the photo:
a pony pump,
a washing machine hose to connect the pump to the water heater drain outlet, and
a garden hose (not shown) to connect the pony pump outlet side to push water up and out through a basement window.
Watch out: some pumps will be damaged if they are run "dry" and others may be damaged by very hot water.
We took care not to plug in our pump until we had cooled down the water heater by running hot water (with the heater heat source turned off) at hot water faucets until they ran cold.
Then we opened the water heater bottom drain valve to feed water into the pump, then we plugged in (turned on) our pump to push water out of the tank and to outdoors.
I was a little worried that water heater debris might clog or even ruin the pump - we stopped once and disassembled the impeller to check but it was fine.
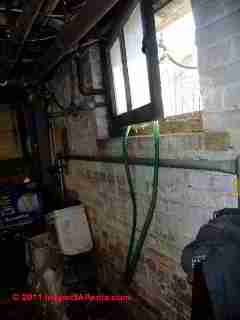
Our photo shows the basement window out of which we routed our drain hose fed by the pump.
Watch out: when you are finished pumping water out of the water heater (the pump sound will change because it's running dry) quickly turn off the pump so it's not damaged, and also quickly close the drain opening at the bottom of the water heater tank so that you don't siphon back water from the garden hose into the water tank.
It's not a catastrophe but we're trying to spill as little water into the basement as possible.
With the hose removed you can open the water heater tank drain valve again to see if you really successfully pumped all of the water out. If you didn't you may spill a bit.
We graded ourselves a "C" on step as we spilled water.
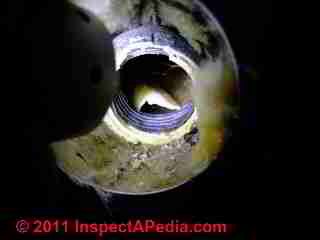
The photograph at above left illustrates the plastic water heater drain valve after we had removed it from the water heater tank.
Look into the Water Heater Tank Bottom
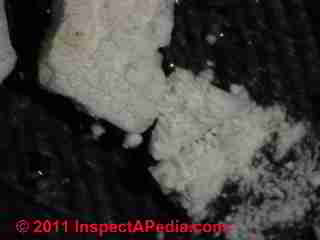
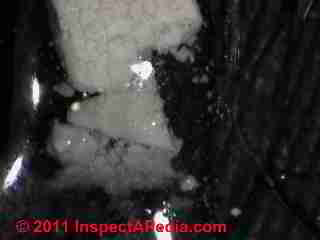
The photos below show what we found in the water heater tank after removing the drain valve.
Above you can see a fragment of plastic dip tube resting right at the water heater drain valve opening.
Below we give a nicer view of the dip tube fragment as we began to fish it out of the tank.
A spring-fingered mechanic's grabbing/fishing tool was handy for this step.
Flushing the Dip Tube Fragments Out of the Water Heater
This was by no means easy. In fact it was a mess.
We figured that in for a penny in for a pound, it would be stupid to just drag out that one big fragment and put everything back together. We wanted to do everything possible to stop that flow of plastic dip tube fragments through the plumbing system where they were clogging faucets every two days.
With the water heater tank empty of water and a plastic bucket held under the drain valve opening, we repeatedly gave the water tank a "shot" of incoming cold water, then quickly turned the water off.
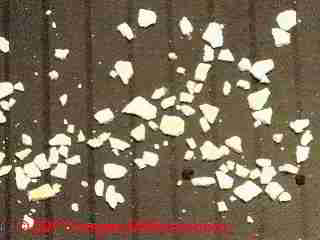
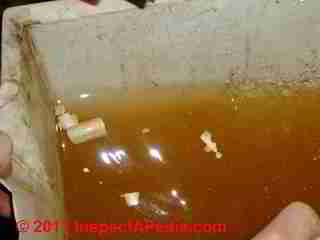
That surge of water was sufficient to push lots more plastic debris and junk into our plastic bucket as you can see in our photo (below left).
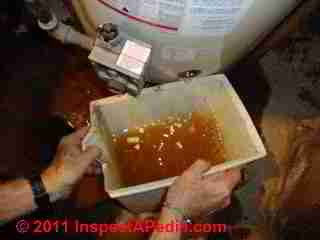
This was a horrible job - with (mostly Ralph) making repeated trips upstairs and outdoors to dump our buckets of debris and water. We spilled plenty on the floor too.
We could have installed a short nipple into the water heater tank drain valve opening to direct more flush out into the bucket and less onto the floor, but we didn't.
I figured that we wanted the largest possible opening to try to get those big fragments out of the water tank.
Leaving any big fragments in the water heater would mean that they would simply be broken up and continue to clog the house plumbing and faucets in the future.
So we kept up this flush surge and bucket emptying cycle until no more debris came out of the water heater tank bottom. Our (limited) view into the water heater tank through this opening now looked clean.
If we had observed scale deposits in the water heater (which we did not expect) we'd have followed the procedure
at WATER HEATER SCALE DE-LIMING PROCEDURE
But we were confident that the we now knew exactly what happened. When the plumber installed a new water heater dip tube, the remnants of the old one were left sitting in the bottom of the water heater tank.
 Don't gripe at your plumber about this.
If s/he had warned you about the possibility of dip tube fragments showing up in the water supply you'd have asked how to prevent that.
The answer would have been this tedious (and if you hired a plumber to do it, time consuming and expensive) process.
Many homeowners would have decided to wait and see.
Confirming The Identity of Water System Particles
Was this water heater tank flush out job successful and did it confirm the dip tube as our suspected source of particles in the water supply piping and clogged faucets?
You betcha.
It was easy to crush the larger soft plastic dip tube pieces into small fragments that matched what was showing up in the building's faucet strainers, and plenty of small matching particles also joined the big ones during our flush job.
Putting The Water Heater Back Together
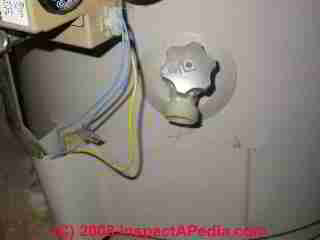
We cleaned up and teflon pipe-doped the threads on the water heater drain valve and reinstalled it. [Photo at left is a different but similar water heater]
Watch out: don't over-tighten a water heater drain valve nor any other part during reinstallation. If you break the part or strip threads it can mean having to buy a whole new water heater.
In tightening a drain valve (or relief valve on the side of a water heater tank) we want the valve mouth to end up pointing down.
 We closed the temperature/pressure relief valve "test lever" [Photo at left is a different but similar water heater]
We re-filled the water heater tank with cold water and
We checked the water heater for leaks.
This job step got an "F" - the valve was leaking even when the water heater was still cold. We tried tapping on the valve gently and flushing the valve seat to no avail.
The leak was a slow drip that continued for a couple of days until we could return, drain enough water out of the tank, then replace the valve with a new one.
Watch out: DO NOT TURN THE WATER HEATER BACK ON BEFORE IT IS FULL OF WATER.
If you make that mistake, on an electric water heater, the heater's electric heating elements will be destroyed in a second or less.
On gas or oil fired heatrers the water heater may also be damaged, destroyed or unsafe if the heater is run before it is full of water.
We turned the water heater back on: restoring its electrical (if it's an electric water heater) or gas supply, and for older heaters that use a gas pilot one would have to re-light the pilot.
Check for leaks again later: We also checked the tank (Ralph did) a day or so after all of our repairs were complete, just to be sure nothing was leaking.
As these reader questions demonstrate, it's not unusual for a deteriorating water heater dip tube or anode to send debris into the water supply system, clogging faucet strainers and shower heads. A deteriorated sacrificial anode an also be a source of water heater odors.
Reader Question: small white particles coming out of our hot water heater clog our faucets
I have small white particles that clog my faucet water savers I was told that plastic material was used in some water heaters and this deteriorates over time, causing this problem. Is this true? I have an A.O. Smith 55 gallon water heater made in 1995. - Bill 2/5/12
Reply: Replace the plastic dip tube that has disintegrated and flush the water tank to remove the debris
2/15/2012 Bill, The symptoms of the white particles clogging the aerator are classic symptoms of a failed dip tube.
The dip tube is a tube that extends from the inlet to the bottom of the water heater to prevent the incoming cold water from mixing with the hot water causing a rapid reduction in temperature of the water going out of the tank.
In the 90's there was a period from about 1992-1997 where almost every water heater made by any manufacturer with few exceptions used a dip tube supplied by the Perfection Tube Company which proved to be defective with the plastic used disintegrating.
This was also the subject of a class action lawsuit for which the claims period is now over. AO Smith was one of the companies and the manufacture date is in the middle of the defect period I have no doubt your dip tube is bad.
On a 17 year old water heater I would recommend replacement as the most viable option. - Red Wood
Bill: we agree completely with Red Wood - Thanks Red for your comments.
We suspect that a combination of high water heater temperatures and possibly a water supply containing chlorine may accelerate the deterioration of this or other plastics in the plumbing system.
We also have had to drain and thoroughly flush a water heater after replacing the dip tube (photo above left). The client's plumber replaced the plastic dip tube that had disintegrated in the water heater, but clogging continued because no one had gotten all that plastic crud out of the tank.
In our article above, beginning
at DEBRIS in WATER SUPPLY, Water Heater we describe the diagnosis and correction of these white plastic debris particles left in the water heater when a plastic dip tube disintegrates.
At WATER HEATER ANODES, DIP TUBES we describe inspection and replacement of water heater dip tubes.
- Daniel [-Editor]
Reader Comments & Q&A
Indeed when the anode begins to deteriorate that can produce debris (as shown on this page) and clog shower heads and faucet strainers;
Besides flushing the water heater tank you may need to replace the sacrificial anode.
Particulates are in all the faucet screens, just worse in shower.
Didn't notice particulates when blowing dow the water heater. Put drain hose in floor drain.
Particles are fine and feel gritty when being removed from screen. Particle size is hard to define...they would easily pass through a window screen but not through the faucet screens.
Have a water softener that has been in place for several years.
Initially had a well person look at the solids (I was thinking it might be the well). He did not think it was anything from the well.
I'm thinking it must be some sort of a chemical reaction perhaps due to the anode.
Tried to comment on this couple times before but don't know what happened.
How irritating.
Are the particles appearing everywhere or just at the shower?
When you flushed the heater did any junk come out?
Is there a water softener installed?
and if so,
If you examine the white debris, is it salty?
Or
is it hard particlates that might be from some plastic source like a damaged pump impeller?
New Bradford White water heater installed about four months ago. Fine white particulate resulting in needing to clean screen in master shower about once a week. Previous water heaters were approximately 20 years old with no problem. We are on well water if this matters. Flushed heater through bottom drain valve on two occasions. Would like to understand prior to calling installer.
M
Are you saying that the dip tube was removed from the NEW water heater when it was installed? If so you need it put back.
You say you are "not getting dirty water" - I think there may be a typographical error. Let's be sure I understand the question.
Installed new water heater had rod removed. Am not getting dirty water on hot only. Have flushed several times but does not help I it is electric. Have softener and only hot is effected
Is it an electric water heater?
Did you turn it on while there was air inside the heater?
If so the elements were probably burned-up.
I drained and flushed my hot water heater and now there is no hot water coming into my laundry box hot water supply. What can I do to fix that? I appreciate any help you can give.
Reader Question: Health hazard from deteriorated CPVC water heater dip tube?
I just found out that our Weil McLain indirect hot water tank has a defective dip tube and has cause my entire home to have loss of water pressure and clogged plumbing fixtures and appliances. The problem became so bad that we lost use of our kitchen silk and shower.
After 2 years of investigation, I ended up contacting Weil McLain and they gave me a new water tank right away. Also, they have agreed to replace the damaged fixtures throughout the entire house.
I am contacting you now to ask if you are aware of any health issues that could arise due to ingesting these particles?
We have 4 small children ranging from 3 to 12 years of age which have been living with this problem (taking baths, drinking water and eating foods prepared with the contaminated water).
I realize this subject may be out of your zone of knowledge but thought best to at least ask, as your website seems very thorough on the subject of dip tub problems.
I thank you in advance for any information or resources you could share with us. - G.S. 3/29/2013
Reply:
I'm sure sorry it took so long to figure out the problem. Someone who knew what they were doing should have found it in five minutes by checking a faucet strainer and recognizing the white particulate debris.
There may be potential health hazards IF the dip tube you describe was made of PVC (which many are - or more likely CPVC) but a literature search I conducted for this reply could not find a reference to such events. I did find reference to testing for CPVC particles from dip tubes in water supplies.
Your first order of business is to find out what the tube was made-of. Or if you have samples of the debris, to have them analyzed.
You'd need something like a, FTIR spectrograph of dip tube plastic and polypropylene.
This test is discussed in Qualitative Procedures For Identifying Particles In Drinking Water, Stephen Booth, Blaise J. - Editors. American Water Works Association, 2005, ISBN 1583213740, 9781583213742
Also see Ruth Ricahrson & Marc dwards, "Vinyl Chloride and Organotin Stabilizers in Water Contacting New and Aged PVC Pipes", Web Report 2991, 2009, Water Research Foundation, 6666 West Quincy Avenue, Denver, CO 80235-3098. Their research included this finding "In all cases VC levels were below the MCL of 0.002 mg/L but above the MCLG (MCL Goal) of 0 mg/L."
Based on those sources I suspect that the actual health risk was low because of the comparatively low total volume of plastic material involved, and that the risk would also vary by water temperature, chemistry, and water volumes involved. But this is NOT my area of expertise.
Your second order of risk assessment business would be to ask an industry expert (see the article I've attached) for an opinion. Beware that there may be a very big gap between theory or opinion and demonstrable fact.
And of course, ask your doctor for an opinion.
...
Continue reading at WATER HEATER FLUSH PROCEDURE - how to clean out a hot water heater tank, or select a topic from the closely-related articles below, or see the complete ARTICLE INDEX.
Or see WATER HEATER DEBRIS FAQs - questions and answers posted originally on this page
Or see these
Recommended Articles
- WATER HEATER SCALE DE-LIMING PROCEDURE
- WATER HEATER DRAIN PROCEDURE
Suggested citation for this web page
WATER HEATER DEBRIS FLUSH at InspectApedia.com - online encyclopedia of building & environmental inspection, testing, diagnosis, repair, & problem prevention advice.
Or see this
INDEX to RELATED ARTICLES: ARTICLE INDEX to WATER HEATERS
Or use the SEARCH BOX found below to Ask a Question or Search InspectApedia
...
Ask a Question or Search InspectApedia
Try the search box just below, or if you prefer, post a question or comment in the Comments box below and we will respond promptly.
Search the InspectApedia website
Note: appearance of your Comment below may be delayed: if your comment contains an image, web link, or text that looks to the software as if it might be a web link, your posting will appear after it has been approved by a moderator. Apologies for the delay.
Technical Reviewers & References
Click to Show or Hide Citations & References
Publisher InspectApedia.com - Daniel Friedman
A O Smith Powder Shot 40 Gal Natural Gas
Source: https://inspectapedia.com/plumbing/Hot_Water_Tank_Debris_Flush.php
0 Response to "A O Smith Powder Shot 40 Gal Natural Gas"
Post a Comment